
UPDATE: I have slightly updated the pattern to include tips for knitting in the round. You can get the updated PDF of the pattern:
download now
Now you can print it!
Materials:
3 colors of Koigu KPM (the semi solid version), 1 skein each.
3 matching colors of either Rowan Haze or the Lion Brand LB Collection Silk Mohair
12 buttons
US Size 4 single pointed needles
4 Size 4 DP needles
embroidery needle big enough to thread 1 strand of koigu and 1 strand of the mohair but small enough to fit through the bottons.
These are knit on straight needles except for the thumb hole. This makes them very fast to finish.
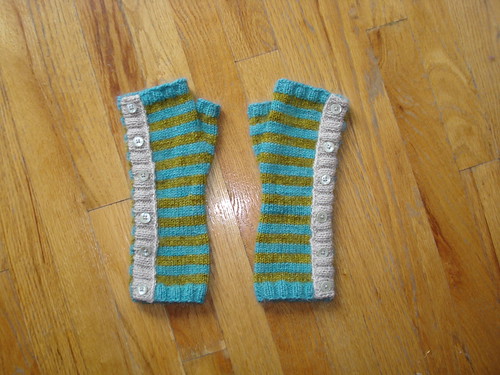
Color's A and B make up the Stripes and Color C is the placket. Each color consists of 1 strand of koigu and 1 strand of the mohair.
Gauge: 5 stitches and 8 rows = 1 inch in stockinette
Cast on 44 stitches.
Rows 1-8: (k2, p2) in Color A
Row 9: p in Color A
Rows 10-29: are stockinette stripes. Each stripe is 4 rows in height. The stripes are as follows: Color B, A, B, A, B
Row 30: k Color A
Row 31: p Color A
Row 32: k4, k2tog, k9, k2tog, k9, k2tog, k9, k2tog, k5 in color A
Row 33: p Color A
Rows 34-53: are stockinette stripes. Each stripe is 4 rows in height. The stripes are as follows: Color B, A, B, A, B
Row 54: k Color A
Row 55: p Color A
Row 56: k5, M1, k10, M1, k10, M1, k10, M1, k5 Color A
Row 57: p Color A
Row 58: k Color B
Row 59: p Color B
Left Hand
Row 60: k20, place marker M1, k2, M1, place marker, k22 color B
Row 61: p Color B
Row 62: k Color A
Row 63: p Color A
Row 64: k to marker, pass marker, M1, k4, M1, pass marker, k22 Color A
Row 65: p Color A
Row 66: k Color B
Row 67: p Color B
Row 68: k to marker, pass marker, M1, k6, M1, pass marker, k22 Color B
Row 69: p Color B
Row 70: k Color A
Row 71: p Color A
Row 72: k to marker, pass marker, M1, k8, M1, pass marker, k22 Color A
Row 73: p Color A
Row 74: k Color B
Row 75: p Color B
Row 76: k to marker, pass marker, M1, k10, M1, pass marker, k22 Color B
Row 77: p Color B
Row 78: k to marker, remove all stitches between markers and place on holding thread or stitch holder, cast on 2 stitches, k to end of row Color A (there should be 44 stitches on the needles and 12 on the holding thread
Row 79: p Color A
Row 80: k Color A
Row 81: p Color A
Row 82-85: stockinette stripe in Color B
Row 86-91: k2, p2 ribbing Color A
Cast off
Right Hand
Row 60: k22, place marker M1, k2, M1, place marker, k20 color B
Row 61: p Color B
Row 62: k Color A
Row 63: p Color A
Row 64: k to marker, pass marker, M1, k4, M1, pass marker, k20 Color A
Row 65: p Color A
Row 66: k Color B
Row 67: p Color B
Row 68: k to marker, pass marker, M1, k6, M1, pass marker, k20 Color B
Row 69: p Color B
Row 70: k Color A
Row 71: p Color A
Row 72: k to marker, pass marker, M1, k8, M1, pass marker, k20 Color A
Row 73: p Color A
Row 74: k Color B
Row 75: p Color B
Row 76: k to marker, pass marker, M1, k10, M1, pass marker, k20 Color B
Row 77: p Color B
Row 78: k to marker, remove all stitches between markers and place on holding thread or stitch holder, cast on 2 stitches, k to end of row Color A (there should be 44 stitches on the needles and 12 on the holding thread
Row 79: p Color A
Row 80: k Color A
Row 81: p Color A
Row 82-85: stockinette stripe in Color B
Row 86-91: k2, p2 ribbing Color A
Cast off
Thumb
Distribute held stitches on 3 db needles as follows, Needle 1 [1 stitch from 1 side of thumb, pick up 4 stitches from inside of thumb hole where 2 were cast on for body of mitt, 1 stitch from other side of thumb], Needle 2 [4 stitches], Needle 3 [6 stitches]
Thumb Row 1: knit all 6 stitches on needle 1, p2, k2, p2, k2, p2
Thumb Row 2: k1, k2tog, k2tog, k1, p2, k2, p2, k2, p2
Thumb Row 3-5: k4, p2, k2, p2, k2, p2
Cast off
There are two ways to finish these. One way involves making buttonholes and having a functioning placket. I thought about that and did not anticipate a time I would be unbuttoning my stretchy mitts so I faked it.
Finishing Step 1: with the wrong side facing out, whip stitch the two sides of the mitt together using the outermost edges of the stitches.
Placket
The placket is attached by picking up stitches along the seam edge furthest from the thumb if you are looking at the back of your hand. This hides the seam, or if you are making a functioning placket, it is where is overlaps and buttons.
Starting from the top of the mitt pick up stitches as such,
4 stitches along top ribbing, 3 stitches from every stripe, and 5 stitches from the bottom ribbing. This is not the entire number of stitches but it is what makes the placket fit.
Placket Rows 1, 3, 5, 7, 9: *(k2, p2) repeat till last two, k2 Color C
Placket Rows 2, 4, 6, 8,: *(p2, k2) repeat till last 2, p2 Color C
cast off
If you were planning on making the placket functioning they you will have to deal with the buttonholes on your own. sorry! I am a new pattern maker and have not yet mastered the perfect buttonhole, much less how to describe it.
Finishing Step 2: Stitch down the edge of the placket to the top of the mitt. I used a single strand of the mohair and a medium length backstitch. This makes the placket look nice and finished, one of the benefits of cheating and faking the closure. You will skip this step if you made a functioning placket obviously, although I doubt you are even reading my directions at this point if you did.
Finishing Step 3: Stitch on buttons with a strand of the koigu and mohair together.
Finishing Step 4: I do this as I go but I am including it just in case. Weave in all ends.
Now go take pictures of your new cute mitts holding a cup of coffee or tea or snowball and post them on Ravelry!
*reminder that I am new to the pattern writing, and I am a lousy editor so if you come across mistakes or if you need clarification let me know!
8 comments:
Oh these are great! Totally going on my list. I'll be linking as well, thanks tons!
I love these! They've been added to my crazy long list of Ravelry favorites!
These are beautiful! And the faux-button holes are brilliant!
Those are way too cool!! Your blog name cracks me up!!
~Cheers!
Andy @ poppiesatplay.blogspot.com
Those are awesome. As for your blog name "priceless".
I just found this pattern on Ravelry - can't wait to make them! Question: what gauge am I looking for? I wanna use up some stuff from my stash but need to know what to aim at! Thanks so much!
Hi Rachel, You will want to use something about sport weight to get my gauge which was 5 stitches and 8 rows per inch.
So beautiful!!! They are om my to do-list!
Post a Comment