Wednesday, March 24, 2010

Inspiration from Florida

A couple years ago I went to Florida for my grandmother's memorial service. Although it was a sad reason to be traveling, it was really lovely to see my dad and hang out with a few relatives I rarely see. I had not spent much time in Florida before except for a trip when I was about 14 for my grandparents wedding anniversary and a couple days in Disney World. What I remembered from that time was that most of Florida seemed brown up until you reach the gates of Disney World and suddenly it is a well manicured tropical wonderland. This time around I got a better look through more adult eyes and I must say, it is not the state for me. Besides being completely allergic, apparently a year round problem there since stuff is always blooming, I could not make sense of the city (Orlando) layout, it just seemed so haphazard. Anyway, while the state seemed kind of, whatever, there was one glorious aspect, and that was fresh oranges. Every morning my grandfather made fresh orange juice from the orange tree in his front yard. I normally hate orange juice. The concentrate stuff just seems bitter and sour, like I am perpetually drinking it after brushing my teeth. This fresh stuff, on the other hand, tasted like a really good summer day and soccer (Yes I grew up in suburban America). Inspired by those oranges on my grandfather's front yard, I went about making these pot holders for my grandpa.


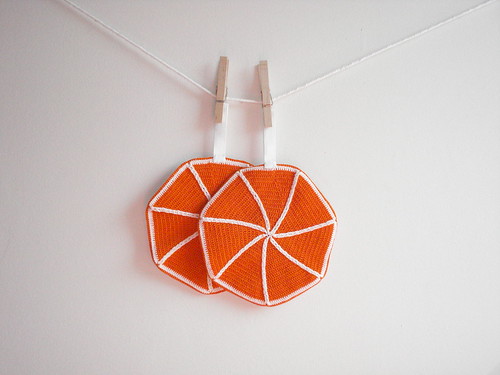
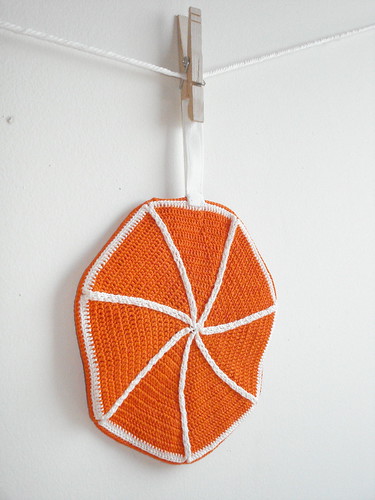
Oranges Pot Holders

I can't really make heads or tails of written crochet instructions, and I don't have the computer program to make a nice chart like my favorite japanese books have, so I have loosely written what I did. This is by no means a comprehensive pattern. Do with it what you will, hopefully you get the general idea.

2 balls of Karabella Cable 5 in Orange, or any size 3 crochet cotton
1 ball of White size 3 crochet cotton

Two lengths of white cotton ribbon, I used White twill tape.

There are 7 wedges per slice.
The # of double stitches (in Orange) into each slice are as follows:
3, 4, 5, 7, 9, 11, 13, 15, 17. 19, 21, 23. 25. 27
Each Wedge is separated by two chain stitches

Then in White I crocheted 29 into the top of each slice and worked a combination of chain stitch and stitching into the ladders between the slices.

With the wrong sides facing, I single stitched, in Orange, the two sides together through the back loops.

Block, sew on loops of Ribbon


Still on the Pot holder front...
I finally got around to photographing another pair of pot holders I finished a while back. They are sort of the Old Fashioned Potholder pattern although I stopped reading that pattern after the 3rd row so I don't think the edge is the same. I added a bit of a sparkly silver edge to finish them off.

Thursday, February 11, 2010

The Day I Ran Away From a Ball of Fire

Today I was running errands for work. I had stopped at a bank, hit up City Bakery for a Pretzel Croissant and was making my way up 6th Ave to Staples to get ink for the office printer. I stopped to watch some firemen working on what looked like a fire being put out in front of the Radio Shack. There was just lots of white smoke billowing and a few of us had slowed to watch from across the street. Suddenly it seemed like the front of Radio Shack exploded out and up in a huge fireball. I stood there like a deer in headlights watching this thing get bigger and bigger, windows exploding out of the building above, and the heat hitting my face. The mail carrier next to me started making a mad dash around the corner. She snapped me out of it and I took off after her. From the corner I watched as black smoke billowed and the sidewalk burned. I stood there for a little bit, kind of freaking out, sipping what had not sloshed out of my City Bakery mocha during my run around the corner. The block filled up with emergency vehicles so I walked over to 5th, where I will be walking from here on out, and called my mother. I do believe I succeeded in giving my parents nightmares for a month. I am hoping to avoid nightmares by watching Mamma Mia tonight.

Here is a picture that was captured by a guy apparently standing near me who was also walking back to work from City Bakery. He was on the ball with this one. Since this picture is everywhere and I have no idea who to ask permission I am just going to post it.


If you want to read more about it here are some links
NYMagazine
Gawker
Gothamist
NY Times

Since I am sure this is the first thing you are wondering... No. No one was hurt by the fire.

Wednesday, January 6, 2010

Mitts Here, Get Your Mitts Here

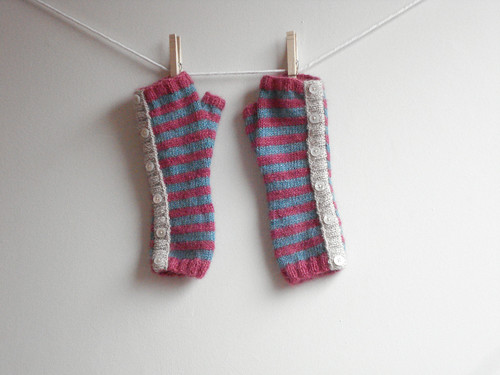
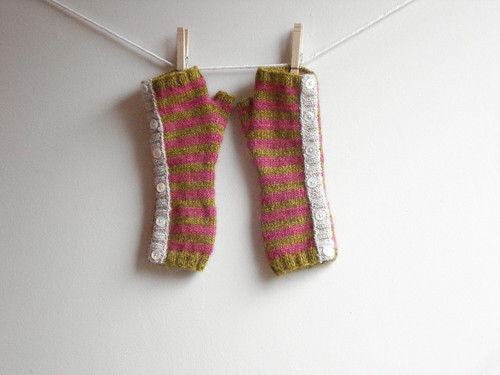
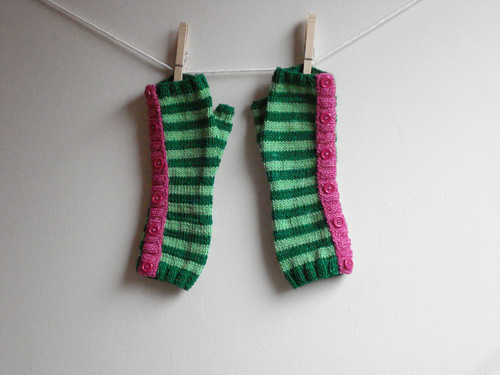
As per usual I am starting the year productively. I have whipped up some pairs of my Great Weekend Mitts for my Etsy shop. You can probably see them on the sidebar but here are larger pics.


Etsy Link

These first two pairs are made from Koigu Premium Palette and paired with either the Lion Brand Silk Mohaiir or Rowan Kidsilk Haze. I must take a moment to express my annoyance with the color palette of the newer, nicer Lion Brand Yarns. What company does not include a good pink or good solid red in it's collection?


Etsy Link

This last pair is knit with Koigu Kersti. I really should not be allowed in Purl Soho... ever. This yarn was an impulse purchase because it is hard to resist those walls of Koigu. Impulse purchases at Purl Soho will drain your bank account. The buttons for this pair were purchased at Lou Lou Buttons while I was hunting for buttons to replace the ones on my cute new winter coat. More on that in a later post.


Etsy Link

God Bless long weekend that make finishing possible. It was bitter, bitter cold out this New Years Weekend and I was happy to stay inside with my knitting and hot chocolate rather than waiting on the subway platform in 40mph winds.

Thursday, December 31, 2009

Mountain Girl in the City

I got back two days ago from a much needed Christmas vacation in Colorado. It was a wonderful, wonderful break and I felt better than I have in months being home. This year was a tough one but one thought kept tugging at me, just an idea of what I needed. This summer I went to a free Judy Collins concert on Governor's Island. It was part of some annual folk music thing that Trinity Church sponsors. Now normally I would not identify myself as a folk music fan, but I had recognized some of her songs after googling and thought "What the hell. It's free and I have never been to Governor's Island." I also kind of love ferries, so there was that. Before the concert even started I was glad that I went. The crowd was happy and pretty hippy, which is to be expected. I recognized most of the music but it was this song I had not heard before that struck me: Mountain Girl. I was homesick a lot this year and the lyrics fit me perfectly.

"Mountain girl in the city
You've been gone far too long
Find your way back to the mountains"

So that is what I did and I have pictures that illustrate this perfectly :)

My "home-home" is in the foothills. I am used to having deer in the backyard because they have stopped by at least once a day my whole life. My mom is a gardener and has a compost pile in the backyard. Unfortunately it rarely every grows in size because the deer, bear, or foxes gorge themselves on whatever we add to the pile. The deer are pretty used to humans to the point that they stop and stare from a couple yards back, or walk slowly in front of the car, but they rarely come right up to humans. Well, this year I went out one day when there was a large herd in the backyard and said hi, meaning I slowly approached them to see how close I could get. Well this time they seemed particularly interested in me so they didn't run. One deer in particular seemed really comfortable with my presence. She licked my hand that day when I reached out.


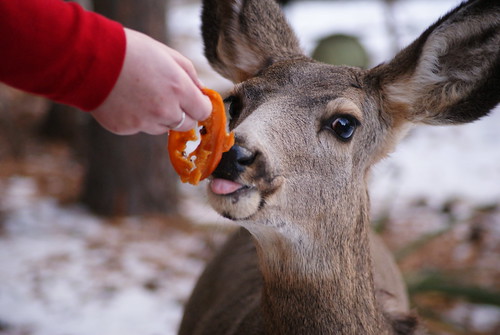
Two days later on Christmas Day I was bringing out the orange slices that had been soaking in our non alcoholic Glögg, to the compost pile and the herd of deer was out there. The one that licked me the first day came right up and ate the oranges out of my hand. I named her Clementine.


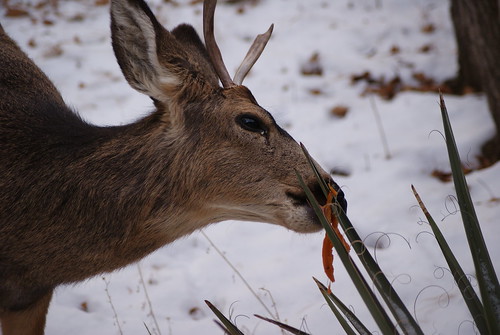
The buck saw this and decided he wanted in on the action, but since bucks can be very aggressive my mom (the photographer) made me go inside. I hung some oranges on the Yucca plant for him. He was grateful.


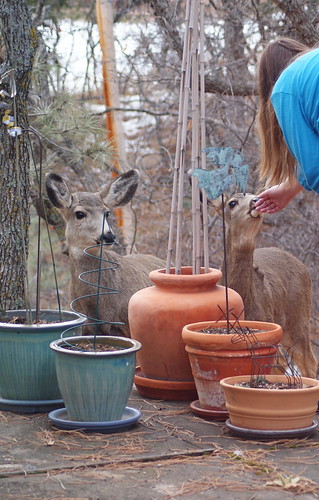
Once the buck went to inspect the neighbors yard I was allowed back out where Clementine was standing with a friend. The friend was slightly more skittish than Clementine but slowly warmed up enough to eat a few oranges as well.


So there you have it. I spent my Christmas with my family and the neighborhood deer, and that is where I am going to leave my blog for 2009.

Happy New Year Friends! Here's hoping 2010 is a great one!

*PSA- Don't go near deer. They are wild animals and I am very bad example. You never know when an animal is diseased or will become aggressive. People are hurt from deer every year. Wild Deer are NOT Bambi!!!!!!!

Monday, December 14, 2009

Mini Santa Hat and a Cylon goes all Christmas-ey

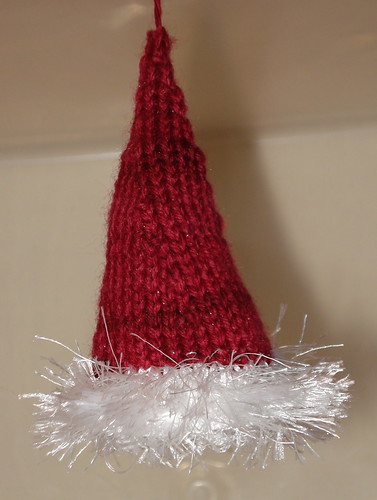
After making 20 mini stockings for the Christmas cards I was left with the thought that next time it will just be hats, because there will be no heels to turn. They may have been tiny but the heels were the thorn in my side. I whipped up this little Santa Hat as a test drive of my theory that it would be easier. It was. I also got to use fun fur which I kind of love but just cannot bring myself to knit with normally mostly because you just can't get away with wearing fun fur, especially in NY.


Mini Santa Hat

Supplies:
fingering weight yarn, I used Knit Picks Kettle Dyed in Wine
Lion Brand Fun Fur Solid in white
4 dp glove needles 4"

In Fingering Weight Yarn:
Cast on 3 stitches, work two rounds like an i-cord
kfb 3 times while transfering stitches to 2 more needles (3 holding needles and 1 working needle)
k 2 rows
(k1, kfb) 3 times
k 2 rows
(k2, kfb) 3 times
k 2 rows
(k3, kfb) 3 times
k 2 rows
(k4, kfb) 3 times
k 2 rows
(k5, kfb) 3 times
k 2 rows
(k6, kfb) 3 times
k 2 rows
(k7, kfb) 3 times
k 2 rows
(k8, kfb) 3 times
k5 rows

In Fun Fur
k 4 rows
Cast off

Fluff Fun Fir. This may involve gently pulling out the loose strands from where they have been caught in the knitting. Once you are satisfied you have gotten most threads loose, hold the hat over a garbage pail and snip fun fir threads to about a quarter inch. This is of course optional, I just found that the 1 inch fur was a bit too long.

Now you can add something to the top, a handmaid pom or store bought one, or even a bell. I didn't add anything which is also always an option.

Thread a cord through the tip top of the hat for hanging.

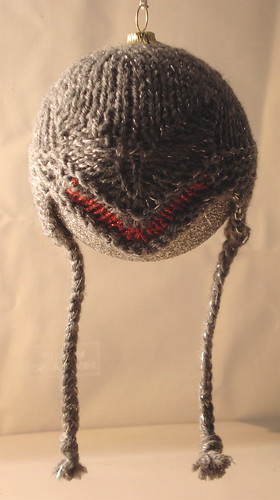
After making this hat I went a little further and made a mini version of the Cylon Hat. I don't have a patten for this since it was just a wing it using the original pattern. I used some Karabella Aurora 8 I have had lying around and a single silver thread. I went a little crazy at School Products a while back and now have large spools of sparkly thread, it's a bit ridiculous really, but seemed like a good idea at the time. The red is a cotton, metallic thread I got on ebay a while back. The ball is a glittery 3" styrofoam ball I picked up at Hobby Lobby when I lived in CO. I ripped out the metal hanger piece and reattached it after stretching the hat over the ball. Silly, but fun.

Mini Knitting Makes Me Feel Productive

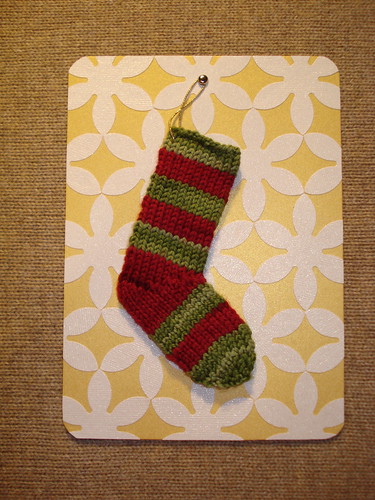
I have embraced mini knitting this fall/winter. It started with a custom order of Christmas Cards. I was asked for 20 christmas cards, whatever I decided to make would work. I'm sure this person thought I would be making my normal fancy paper cards but in a moment of insanity I decided to make 20 mini stockings that could be used as ornaments and attach them to 20 swing cards. They take just over an hour to make once you get in the swing of things.


Mini Stockings

Supplies
2 colors fingering weight yarn, I used Shibui sock and Knit Picks Kettle Dyed.
5 dp glove needles size 1 (4 inches in length)
Gold Twine

In Color A
Cast on 4 stitches, working in the round, knit front and back (kfb) of all stitches on 4 needles.
k row
(k1, kfb) repeat
k row
(k2, kfb) repeat
k row
(k3, kfb) repeat
krow

Color B
k 5 rows

Color A
k 5 rows

Color B (short row heel)
k 1 row
k9, wrap stitch, turn work
p18, wrap stitch, turn work
k16, wrap stitch, turn work
p14, wrap stitch. turn work
k12, wrap stitch, turn work
p10, wrap stitch, turn work
k8, wrap stitch, turn work
p6, wrap stitch, turn work
k4, wrap stitch, turn work
p2, wrap stitch, turn work
k2, pick up wrapped stitch and knit with stitch, wrap stitch, turn work
p3, pick up wrapped stitch and purl with stitch, wrap stitch, turn work
k4, (pick up wrapped stitch and knit with stitch) 2 times, wrap stitch, turn work
p6, (pick up wrapped stitch and purl with stitch) 2 times, wrap stitch, turn work
k8, (pick up wrapped stitch and knit with stitch) 2 times, wrap stitch, turn work
p10, (pick up wrapped stitch and purl with stitch) 2 times, wrap stitch, turn work
k12, (pick up wrapped stitch and knit with stitch) 2 times, wrap stitch, turn work
p14, (pick up wrapped stitch and purl with stitch) 2 times, wrap stitch, turn work
k16, (pick up wrapped stitch and knit with stitch) 4 times, k18 This row completes the heel and a return to knitting in the round.

Color A
k 5 rows

Color B
k 5 rows

Color A
k 5 rows

Color B
k 5 rows

Color A
k 5 rows
Cast Off

Cut a length of gold twine about 6" in length, thread it through upper corner of stocking and hide knot in stocking.

Monday, July 27, 2009

Great Weekend Mitts

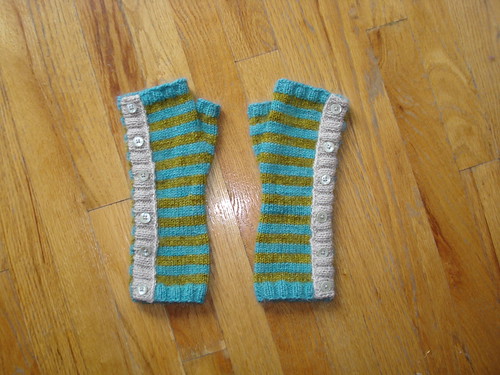
These mitts were made on a truly great weekend I had a while back. I had been inspired by the mitts the character Penny wears in Dr Horrible's and needed a cute project for the BSG Fleet Power Battle on Ravelry. There are patterns out there already but I decided to make up my own. So here they are, my Great Weekend Mitts.

UPDATE: I have slightly updated the pattern to include tips for knitting in the round. You can get the updated PDF of the pattern:
download now
Now you can print it!


Materials:
3 colors of Koigu KPM (the semi solid version), 1 skein each.
3 matching colors of either Rowan Haze or the Lion Brand LB Collection Silk Mohair
12 buttons
US Size 4 single pointed needles
4 Size 4 DP needles
embroidery needle big enough to thread 1 strand of koigu and 1 strand of the mohair but small enough to fit through the bottons.

These are knit on straight needles except for the thumb hole. This makes them very fast to finish.

Color's A and B make up the Stripes and Color C is the placket. Each color consists of 1 strand of koigu and 1 strand of the mohair.

Gauge: 5 stitches and 8 rows = 1 inch in stockinette

Cast on 44 stitches.

Rows 1-8: (k2, p2) in Color A
Row 9: p in Color A
Rows 10-29: are stockinette stripes. Each stripe is 4 rows in height. The stripes are as follows: Color B, A, B, A, B
Row 30: k Color A
Row 31: p Color A
Row 32: k4, k2tog, k9, k2tog, k9, k2tog, k9, k2tog, k5 in color A
Row 33: p Color A
Rows 34-53: are stockinette stripes. Each stripe is 4 rows in height. The stripes are as follows: Color B, A, B, A, B
Row 54: k Color A
Row 55: p Color A
Row 56: k5, M1, k10, M1, k10, M1, k10, M1, k5 Color A
Row 57: p Color A
Row 58: k Color B
Row 59: p Color B

Left Hand
Row 60: k20, place marker M1, k2, M1, place marker, k22 color B
Row 61: p Color B
Row 62: k Color A
Row 63: p Color A
Row 64: k to marker, pass marker, M1, k4, M1, pass marker, k22 Color A
Row 65: p Color A
Row 66: k Color B
Row 67: p Color B
Row 68: k to marker, pass marker, M1, k6, M1, pass marker, k22 Color B
Row 69: p Color B
Row 70: k Color A
Row 71: p Color A
Row 72: k to marker, pass marker, M1, k8, M1, pass marker, k22 Color A
Row 73: p Color A
Row 74: k Color B
Row 75: p Color B
Row 76: k to marker, pass marker, M1, k10, M1, pass marker, k22 Color B
Row 77: p Color B
Row 78: k to marker, remove all stitches between markers and place on holding thread or stitch holder, cast on 2 stitches, k to end of row Color A (there should be 44 stitches on the needles and 12 on the holding thread
Row 79: p Color A
Row 80: k Color A
Row 81: p Color A
Row 82-85: stockinette stripe in Color B
Row 86-91: k2, p2 ribbing Color A
Cast off

Right Hand
Row 60: k22, place marker M1, k2, M1, place marker, k20 color B
Row 61: p Color B
Row 62: k Color A
Row 63: p Color A
Row 64: k to marker, pass marker, M1, k4, M1, pass marker, k20 Color A
Row 65: p Color A
Row 66: k Color B
Row 67: p Color B
Row 68: k to marker, pass marker, M1, k6, M1, pass marker, k20 Color B
Row 69: p Color B
Row 70: k Color A
Row 71: p Color A
Row 72: k to marker, pass marker, M1, k8, M1, pass marker, k20 Color A
Row 73: p Color A
Row 74: k Color B
Row 75: p Color B
Row 76: k to marker, pass marker, M1, k10, M1, pass marker, k20 Color B
Row 77: p Color B
Row 78: k to marker, remove all stitches between markers and place on holding thread or stitch holder, cast on 2 stitches, k to end of row Color A (there should be 44 stitches on the needles and 12 on the holding thread
Row 79: p Color A
Row 80: k Color A
Row 81: p Color A
Row 82-85: stockinette stripe in Color B
Row 86-91: k2, p2 ribbing Color A
Cast off

Thumb
Distribute held stitches on 3 db needles as follows, Needle 1 [1 stitch from 1 side of thumb, pick up 4 stitches from inside of thumb hole where 2 were cast on for body of mitt, 1 stitch from other side of thumb], Needle 2 [4 stitches], Needle 3 [6 stitches]
Thumb Row 1: knit all 6 stitches on needle 1, p2, k2, p2, k2, p2
Thumb Row 2: k1, k2tog, k2tog, k1, p2, k2, p2, k2, p2
Thumb Row 3-5: k4, p2, k2, p2, k2, p2
Cast off

There are two ways to finish these. One way involves making buttonholes and having a functioning placket. I thought about that and did not anticipate a time I would be unbuttoning my stretchy mitts so I faked it.

Finishing Step 1: with the wrong side facing out, whip stitch the two sides of the mitt together using the outermost edges of the stitches.

Placket
The placket is attached by picking up stitches along the seam edge furthest from the thumb if you are looking at the back of your hand. This hides the seam, or if you are making a functioning placket, it is where is overlaps and buttons.

Starting from the top of the mitt pick up stitches as such,
4 stitches along top ribbing, 3 stitches from every stripe, and 5 stitches from the bottom ribbing. This is not the entire number of stitches but it is what makes the placket fit.

Placket Rows 1, 3, 5, 7, 9: *(k2, p2) repeat till last two, k2 Color C
Placket Rows 2, 4, 6, 8,: *(p2, k2) repeat till last 2, p2 Color C
cast off

If you were planning on making the placket functioning they you will have to deal with the buttonholes on your own. sorry! I am a new pattern maker and have not yet mastered the perfect buttonhole, much less how to describe it.

Finishing Step 2: Stitch down the edge of the placket to the top of the mitt. I used a single strand of the mohair and a medium length backstitch. This makes the placket look nice and finished, one of the benefits of cheating and faking the closure. You will skip this step if you made a functioning placket obviously, although I doubt you are even reading my directions at this point if you did.

Finishing Step 3: Stitch on buttons with a strand of the koigu and mohair together.

Finishing Step 4
: I do this as I go but I am including it just in case. Weave in all ends.

Now go take pictures of your new cute mitts holding a cup of coffee or tea or snowball and post them on Ravelry!

*reminder that I am new to the pattern writing, and I am a lousy editor so if you come across mistakes or if you need clarification let me know!